Powerful TNC functions for perfect molds
Deviations of the radius cutter's geometry from the ideal circular shape can negatively influence the surface quality and contour accuracy of a workpiece. With the aid of the powerful and three-dimensional tool-radius compensation option 3D-ToolComp and Cycle 444 PROBING IN 3-D offered by TNC controls from HEIDENHAIN, these deviations can be compensated for quickly and easily. No elaborate tool measurement or additional equipment is necessary. This compensation can take place simply with the means that are already available on most milling machines.
Despite all of the precision that goes into tool manufacturing, radius cutters in particular lack a uniform geometry. The radius of every single tool typically exhibits distinct deviations from an ideal circular form. Research has shown that deviations of up to 0.015 mm can be expected for a standard tool. Even expensive, high-end precision cutters can have deviations in the micron range. This is a problem for high-accuracy machining, since the contact point of the milling radius with the workpiece as calculated by the control does not match the actual radius, and this is the case with each individual milling cutter. With the 3D-ToolComp option and Cycle 444 PROBING IN 3-D, the user can compensate for these deviations quickly and easily.
In order to determine the radius deviations of the cutter to be used, the user performs a trial run with the tool on a test workpiece. He then measures the milled contour with a touch probe that was previously calibrated with 3D-ToolComp.
The TNC control then converts the deviations determined in this manner of the milled contour compared to the ideal contour into radius deviations of the tool and writes these values to a compensation-value table. This compensation-value table is used to define angle-dependent delta values that describe the tool deviation from the ideal circular form. In the subsequent actual machining the TNC control then compensates for the radius value defined at the current tool contact point on the workpiece.
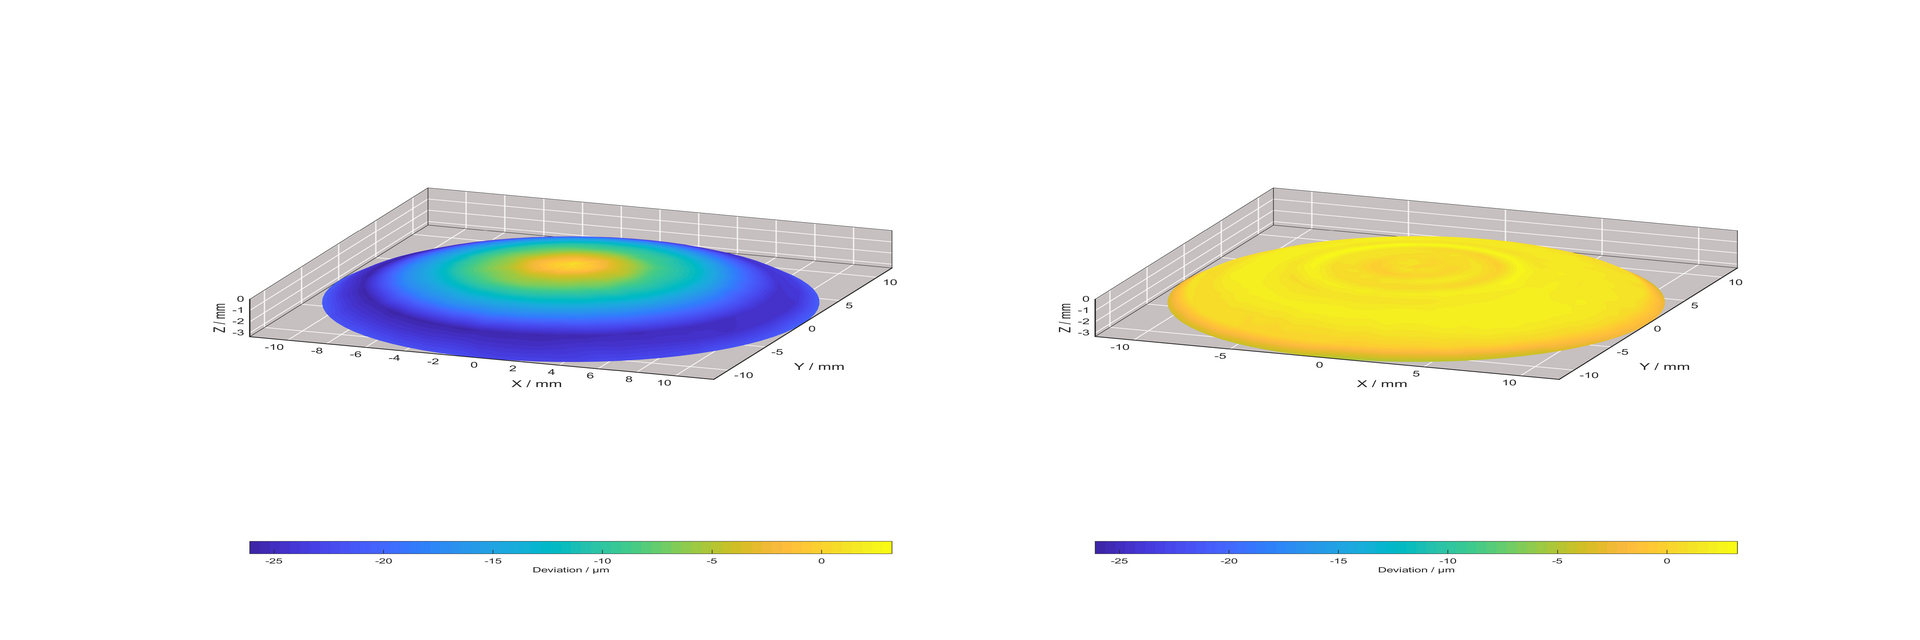
The example of machining an aspheric lens with a diameter of 20 mm very clearly shows the effectiveness of 3D-ToolComp. After the test cut, a touch probe uses Cycle 444 PROBING IN 3-D to ascertain significant deviations of up to 25 µm from the desired shape of the lens. After using 3D-ToolComp to compensate for the radius deviations, the form deviations over the entire surface of the aspheric lens are under 5 µm. For the contact point to be determined with precision, the NC program must be generated with surface-normal blocks (LN blocks) by the CAM system. These surface-normal blocks define the tool position and the contact point on the workpiece, and optionally specify the tool orientation relative to the workpiece surface. The TNC-controlled machine tool automatically performs the compensation.

